How to Validate Config YAML with Pydantic in Machine Learning Pipelines
1. Why Use Config Files (in ML)?
In ML projects, you always want to keep data and code separate. The code trains the model, but depending on your data, you might want to have different hyperparameters and settings for that model. Instead of hardcoding the paths and hyperparameters, we externalize them into a YAML file. This gives you:
- Reproducibility → The config is included in your git commit, so you can re-run the same experiment months later.
- Safety → Pydantic models can validate types and ranges, so you don’t try to train with
train_size=1.5by mistake. - Team-friendliness → collaborators can tweak
config.yamlwithout touching your code.
Rule of Thumb: Put everything related to your data in the config (paths, split ratios, target column). This includes your feature selection (missing value strategy, which columns to include or drop, etc.) and then also adds the model hyperparameters.
2. Pydantic Basics (Quickstart)
Without Pydantic and validation it would go like this
So, let's assume you have your .yaml file ready with all your parameters. With a library like pyyaml you can read this into a dictionary very easily:
train_size: 0.6
target_column: 'Premium Amount'
start_date: 1990-05-22
import yaml

with open('config.yaml', 'r') as file:
	config = yaml.safe_load(file)
pyyaml will automatically convert data types as best as it can. This includes dates like 1990-05-22, as above, but only if they follow the ISO 8601 standard for dates and times.
And that's part of the problem. If you or your colleague forgets to use this format and writes 22.05.1990 instead, the safe_load() method will still read it into your data. But now it will be a string and not a date 😫 You will get a weird error message deep in your code, where the date is used, and it might take you ages to trace that back to the .yaml.
Or you accidentally wrote 19 instead of 1.9, and the variable is only supposed to be between 0-10. Your model might never converge, and that typo will take ages to find.
Of course, you could write assessments for all of these values by hand, but Pydantic offers you something much more convenient and less error-prone.
What Pydantic offers you - Base Classes and Validators
Before diving into ML configs, let’s cover the core Pydantic concepts you’ll need:
BaseModel
Every config model inherits from the class pydantic.BaseModel.
This provides automatic parsing, type validation, and helpful errors.
from pydantic import BaseModel

class TrainingConfig(BaseModel):
    target_column: str
    n_estimators: int
Usage:
cfg = TrainingConfig(target_column="price", n_estimators=100)
print(cfg.n_estimators)  # → 100
If you input a variable with the wrong type, like this (or via the .yaml of course)
cfg = TrainingConfig(target_column="price", n_estimators="test")
Pydantic will raise a clear error:
pydantic_core._pydantic_core.ValidationError: 1 validation error for TrainingConfig
cfg.n_estimators
  Input should be a valid integer, unable to parse string as an integer [type=int_parsing, input_value='test', input_type=str]
    For further information visit https://errors.pydantic.dev/2.11/v/int_parsing
Field
In addition to the type of the variable, you can use Field() to declare:
- Defaults
- Constraints (e.g. ≥0 via
ge, ≤1 viale) - Descriptions (optional)
from pydantic import Field

class SplitConfig(BaseModel):
    train_size: float = Field(0.8, ge=0, le=1, description="Fraction of data for training")
    test_size: float = Field(0.2, ge=0, le=1, description="Fraction of data for testing")
This ensures only values between 0 and 1 are accepted.
Validators
Use validators to check for values that should fulfill certain qualities that are not simply "Numbers should be between 0 and 1".
For example, ensuring all split sizes sum to 1:
from pydantic import model_validator

class SplitConfig(BaseModel):
    train_size: float = 0.6
    val_size: float = 0.2
    test_size: float = 0.2

    @model_validator(mode="after")
    def check_sum(cls, values):
        total = values.train_size + values.val_size + values.test_size
        if abs(total - 1.0) > 1e-6:
            raise ValueError("train + val + test must sum to 1")
        return values
Now, if your YAML says train_size: 1.5, you’ll get an immediate ValidationError, not a cryptic pandas slicing error 10 minutes later.
3. Setup: Dependencies and File Structure
Dependencies for this tutorial include pydantic and pyyaml.
uv add pydantic pyyaml
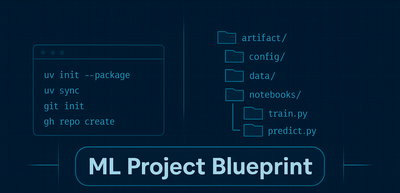
Repo structure building on the structure of the previous post:
.
├─ config/
│  └─ config.yaml
├─ data/                  # small CSV for demo
├─ scripts/
│  └─ one_stop_script.py
├─ src/
│  └─ ml_blueprint/
│     ├─ __init__.py
│     ├─ config.py       # Pydantic loaders
│     ├─ data.py         # read + split
│     └─ model.py        # trainer
├─ pyproject.toml
This ensures:
src/is importable (from ml_blueprint import ...works),- Config lives outside source code,
- Scripts are thin wiring layers.
4. Define the Config Models
I like to define multiple configuration classes that each encompass a specific domain. That way, I can pass the objects to the modular code for the data pipeline or the model trainer, respectively, and it's easier to find the right variable.
In src/ml_blueprint/config.py:
- Use Pydantic models to validate YAML against a schema,
- Create small, typed models with sensible defaults.
- Provide a loader that accepts either a flat mapping or an
ml_blueprint:namespace. - Fail fast with validation errors instead of mysterious runtime bugs.
from pydantic import BaseModel, Field, model_validator
from pathlib import Path
import yaml

class SplitConfig(BaseModel):
    train_size: float = Field(0.6, ge=0, le=1)
    val_size: float = Field(0.2, ge=0, le=1)
    test_size: float = Field(0.2, ge=0, le=1)
    random_state: int = 42

    @model_validator(mode="after")
	# ... see above

class DataConfig(BaseModel):
    source_path: Path = Path("./data/playground")
    target_path: Path = Path("./data/processed")
    split: SplitConfig = SplitConfig()

# ...

class AppConfig(BaseModel):
    data: DataConfig = DataConfig()
    training: TrainingConfig = TrainingConfig()
    model: ModelConfig = ModelConfig()

    @classmethod
    def from_yaml(cls, path: str | Path) -> "AppConfig":
        data = yaml.safe_load(Path(path).read_text()) or {}
        if "ml_blueprint" in data:
            data = data["ml_blueprint"]
        return cls.model_validate(data)
5. Write the YAML
Not much magic to this one - just add the entries that you defined in the config.py for your current experiment. These two files (the .yaml and the config.py) will grow next to each other as you code on your project. They will also probably be refactored a few times as the project grows and becomes more and more complex.
Here's an example from the blueprint-project: config/config.yaml
ml_blueprint:
  data:
    source_path: ./data/playground-series-s4e12
    target_path: ./data
    split:
      train_size: 0.6
      val_size: 0.2
      test_size: 0.2
      random_state: 42
  training:
    target_column: Premium Amount
    drop_columns: ['Policy Start Date']
  model:
    random_state: 42
    xgb:
      n_estimators: 300
      learning_rate: 0.17
      max_depth: 7
      subsample: 0.3
      # ... more hyperparameters
6. Load & Run
Your scripts should be as thin as possible and orchestrate all your logic pieces. Part of that is now that you load the configuration and then pass its parts to the respective modules.
Here's an example of a simple training script (scripts/one_stop_script.py in the appended repository) for demonstration purposes:
from ml_blueprint.data import DataHandler
from ml_blueprint.model import ModelTrainer
from ml_blueprint.config import load_config

cfg = load_config("config/config.yaml")

data_handler = DataHandler(cfg.data)
data_handler.prepare_data()
train_df, val_df, test_df = data_handler.get_data()

trainer = ModelTrainer(train_df, val_df, test_df)
trainer.separate_columns(target_col=cfg.training.target_column)
model = trainer.build_pipeline(RANDOM_STATE=cfg.model.random_state)
model.fit(trainer.X_train, trainer.y_train)
trainer.evaluate()
Notice:
- Script does not hardcode any paths (except for the one pointing to the configuration), sizes, or hyperparams.
- Change YAML → new run behavior → reproducibility
You can also pass the configuration file to the script using a command-line change:
parser = argparse.ArgumentParser(description="Run end-to-end ML pipeline.")
parser.add_argument(
        "-c",
        "--config",
        type=Path,
        required=True,
        help="Path to YAML config file.",
    )
args = parser.parse_args()
cfg = load_config(args.config)
# rest as above
argparse takes the long flag name (here --config) and creates an attribute with that name (minus the dashes). That’s why you can access the parsed value via args.config. If you want a different attribute name, you can override it with dest.7. Refactor classes like DataHandler to use the passed configuration
Keep modules like data.py clean: it should depend only on the DataConfig object, not 20 separate numbers and strings.
class DataHandler:
    def __init__(self, data_config: DataConfig):
        self.cfg = data_config

    def prepare_data(self):
	    # for example refer to the source_path
        df = pd.read_csv(self.cfg.source_path / "train.csv", index_col=0)

        train, temp = train_test_split(
            df, test_size=self.cfg.split.test_size, random_state=self.cfg.split.random_state
        )
	# ...
8. Validate
Ensure you have all dependencies installed:
uv add pydantic pyyaml # plus more that you need for the ML part itself
Run:
uv run python scripts/one_stop_script.py # or whatever your script name is
Try messing up the YAML (wrong type, wrong key, invalid split) → Pydantic will catch it before your training pipeline does.
9. Pattern Checklist (Reusable!)
✅ Small Pydantic models with defaults & type safety,
✅ Namespace YAML under a top-level key (optional but neat),
✅ Provide a single load_config() entrypoint,
✅ Pass full config objects to constructors instead of long param lists,
✅ Scripts stay thin: config-in, wire-up, call main steps.
Sources and Links
- The official Pydantic docs: https://docs.pydantic.dev/latest/concepts/models/
- A cool overview from a public-repo MLOps Course: https://mlops-coding-course.fmind.dev/2.%20Prototyping/2.2.%20Configs.html on why you should use configs
No spam, no sharing to third party. Only you and me.


Member discussion